
Transmission Control Protocol (TCP) is an important next step in the PioWi protocol stack; it opens the way to various network applications, such as the ubiquitous Web server.
In this post I’ll be introducing a fast Web server, that can be used for intensive data-transmission duties; in the next post it’ll be used to implement a Web camera with still- and video-image capabilities.
TCP
At first sight, TCP may look quite simple to implement; it adds reliability to the network transmissions by establishing a ‘connection’ between 2 systems, with each side tracking the other’s transmissions, and acknowledging receipt. However, there are various subtleties to the TCP protocol that make it very challenging to implement, namely:
- Out-of-order arrival. Since there is no fixed path for the data blocks to move across the network, a newer block may arrive after an older one.
- Data flow. A unit that sends data must regulate its flow so as to not overwhelm the receiver.
- Disorderly shutdown. When the data transfer is complete, sender and receiver will attempt to shut down the connection in an orderly fashion, but sometimes this will fail, leaving a connection half-open.
- Buffering. The data sender won’t know if its data has been received until an acknowledgement is received from the receiver, so it must buffer the data just in case it has to be resent.
- Symmetry. Although one system ( the ‘client’) initiates communication with another (the ‘server’), once the connection is established it is completely symmetrical, with either side being able to send & receive the data, or terminate the connection.
- Multiple connections. Servers are usually required to handle multiple simultaneous connections, from multiple clients.
It is well worth reading the TCP specification RFC9293; implementing a full-scale TCP stack is a complex task, so the initial focus of this post will be on a server that primarily sends data – it receives requests from clients, but is optimised for the sending of bulk data from server to client.
State machine
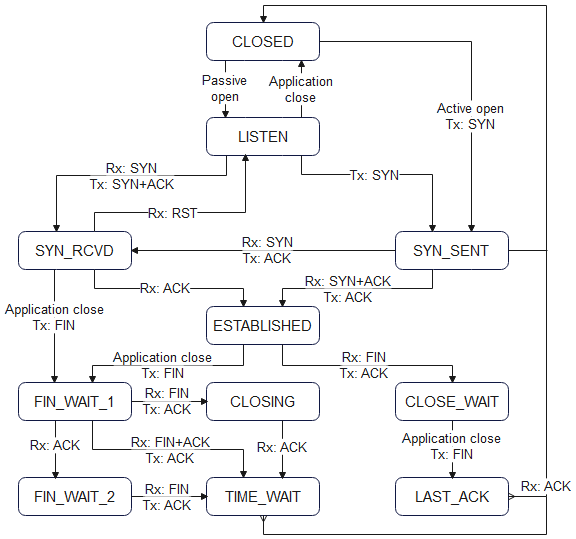
The behaviour of the TCP stack is controlled by a sate machine, that processes open/close/acknowledgement signals from the remote system, and open/close signals from a higher-level application, and decides what to do next. The signals from the remote system are in the form of binary flags, most notably:
- SYN: open a connection (synchronise)
- ACK: acknowledge a transmission
- FIN: close a connection (finish)
- RST: reject a transmission (reset)
Since the connection is symmetrical, both sides have to receive a SYN to make the connection, and a FIN to close that connection. Here is a sample transaction, showing how a Web client and server might transfer a small Web page:
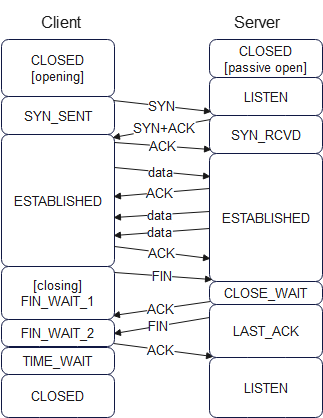
The server has a permanently-open port (‘passive’ open) that is ready to accept incoming connection requests. The client application sets up the connection by sending a SYN to the server, which responds with SYN + ACK, then the client sends an ACK to confirm. Both sides now consider the connection to be ‘established’, and either side can start sending data. In the case of a Web browser, the client sends an HTTP-format request for a Web page; the details of that request will be explained later.
After the server acknowledges the request, it sends 2 data blocks as a response, which the client acknowledges using a single ACK. In this example I’ve then shown the client closing the connection by sending a FIN, which is acknowledged, then confirmed by the server sending a FIN, however in many cases there will be a more sizeable exchange of data, and the connection might be kept open for further requests and responses, to avoid the (very significant) overhead of opening and closing the connection.
TCP sequence number and window size
Both sides of the TCP connection need to keep track of the data sent & received; this is done with a ‘sequence number’, that essentially points to the current starting position of the data within a virtual data buffer, with 3 extra complications:
- The SYN and FIN markers each count as 1 extra data byte.
- The first transmission doesn’t have a sequence number of zero; a pseudo-random value is used, to reduce the likelihood of the current data blocks being confused with blocks that might be left over from a previous transaction.
- The number is 32 bits wide. and wraps around when the maximum value is exceeded.
To avoid congestion, there must some way for a unit to signal how much buffer space it has left; this is done by the ‘window size’ parameter in the TCP message. This value isn’t necessarily a reflection of the actual space available, as there is a danger that a small value will cause a lot of small data blocks to be generated (which is very inefficient), rather than waiting for a good-sized space to be available.
Message format
The protocol header has source & destination port numbers (similar to UDP), also the sequence & acknowledgement numbers and window size, that are needed for error handling and flow control. The flags are a bit-field containing SYN, ACK, FIN, RST and other indications.
/* ***** TCP (Transmission Control Protocol) header ***** */
typedef struct tcph
{
    WORD  sport,            /* Source port */
          dport;            /* Destination port */
    DWORD seq,              /* Sequence number */
          ack;              /* Ack number */
    BYTE  hlen,             /* TCP header len (num of bytes << 2) */
          flags;            /* Option flags */
    WORD  window,           /* Flow control credit (num of bytes) */
          check,            /* Checksum */
          urgent;           /* Urgent data pointer */
} TCPHDR;

#define TCP_DATA_OFFSET (sizeof(ETHERHDR) + sizeof(IPHDR) + sizeof(TCPHDR))

#define TCP_FIN     0x01    /* Option flags: no more data */
#define TCP_SYN     0x02    /*           sync sequence nums */
#define TCP_RST     0x04    /*           reset connection */
#define TCP_PUSH    0x08    /*           push buffered data */
#define TCP_ACK     0x10    /*           acknowledgement */
#define TCP_URGE    0x20    /*           urgent */
The checksum is similar to UDP in that it includes a ‘pseudo-header’ with source & destination IP addresses.
/* ***** Pseudo-header for UDP or TCP checksum calculation ***** */
/* The integers must be in hi-lo byte order for checksum */
typedef struct              /* Pseudo-header... */
{
    IPADDR sip,             /* Source IP address */
          dip;              /* Destination IP address */
    BYTE  z,                /* Zero */
          pcol;             /* Protocol byte */
    WORD  len;              /* UDP length field */
} PHDR;
HTTP
TCP can be used to carry a wide variety of higher-level protocols, but a frequent choice is Hypertext Transfer Protocol (HTTP), that is used by a Web browser to request data from a Web server.
An HTTP request consists of:
- A request line, specifying the method to be used, the resource to be accessed, and the HTTP version number. A query string may optionally be appended to the resource name, to provide additional requirements.
- Optional HTTP headers, or header fields, specifying additional parameters
- A blank line, marking the end of the header
- A message body, if needed
The server responds with:
- A status line, with a status code and reason phrase, indicating if the resource is available.
- HTTP headers, or header fields, giving information about the resource, and the server that is providing it.
- A blank line
- A message body, containing the resource data
Some of the headers used in the Web server code:
#define HTTP_200_OK         "HTTP/1.1 200 OK\r\n"
#define HTTP_404_FAIL       "HTTP/1.1 404 Not Found\r\n"
#define HTTP_SERVER         "Server: picowi\r\n"
#define HTTP_NOCACHE        "Cache-Control: no-cache, no-store, must-revalidate\r\n"
#define HTTP_CONTENT_HTML   "Content-Type: text/html; charset=ISO-8859-1\r\n"
#define HTTP_CONTENT_JPEG   "Content-Type: image/jpeg\r\n"
#define HTTP_CONTENT_TEXT   "Content-Type: text/plain\r\n"
#define HTTP_CONTENT_BINARY "Content-Type: application/octet-stream\r\n"
#define HTTP_CONTENT_LENGTH "Content-Length: %d\r\n"
#define HTTP_ORIGIN_ANY     "Access-Control-Allow-Origin: *\r\n"
#define HTTP_MULTIPART      "Content-Type: multipart/x-mixed-replace; boundary=mjpeg_boundary\r\n"
#define HTTP_BOUNDARY       "\r\n--mjpeg_boundary\r\n"
Web browsers have a create tendency to store (‘cache’) and re-use Web pages, which is a major problem if we are trying to display ‘live’ data, so the NOCACHE header can be used to tell the browser not to cache the resource data.
A browser can handle a wide range of data formats, but only if it is informed which format has been used. The CONTENT headers clarify this, and are essential for displaying the data correctly.
A feature of modern Web browsers is that they block ‘cross-site scripting’ by default. This means that the browser can’t insert data from one server, whilst displaying a page from another. This is very important when dealing with high-security applications such as banking, to prevent a rogue site from impersonating a legitimate site by displaying portions of its pages. It also forces all the pages and data to be hosted on a single Web server, which can be a nuisance for embedded systems with limited capabilities; it is better to host the static Web pages on another site, so the embedded system just has to provide the sensor data to be displayed on those pages. The ORIGIN_ANY header enables this, by allowing the data to be used by any other Web site.
The MULTIPART definition is useful for defining a video stream, that consists of a sequence of still images. The video server I’m creating uses Motion JPEG (MJPEG) which is just a stream of JPEG images, so the browser needs an indication as to where one image ends, and the next begins. So MULTIPART specifies a (hopefully unique) marker that can be sent after each frame as a delimiter, that triggers the browser to display the last-received frame, and prepare to receive a new one. The end-result is that the still images are displayed as a continuous stream, emulating a conventional video file, albeit with a larger file-size, due to the absence of inter-frame compression.
Web server API
Programming a Web server in C can get quite complicated, especially when we’re not running a multi-tasking operating system. The usual model is for each connection to ‘block’ (i.e. stall) until data is available, but that isn’t feasible in a single-tasking system.
So instead I’ve created an event-oriented system, where a callback function is registered for each Web page:
web_page_handler("GET /test.txt", web_test_handler);
web_page_handler("GET /data.txt", web_data_handler);
These handler functions are only called if the relevant Web page is requested, so they don’t consume any resources until that happens.
If the page just has some simple static text, that is loaded into a buffer, and a socket closure is requested:
// Handler for test page
int web_test_handler(int sock, char *req, int oset)
{
    static int count = 1;
    int n = 0;

    if (req)
    {
        printf("TCP socket %d Rx %s\n", sock, req);
        sprintf(temps, "<html><pre>Test %u</pre></html>", count++);
        n = web_resp_add_str(sock,
            HTTP_200_OK HTTP_SERVER HTTP_NOCACHE HTTP_CONNECTION_CLOSE
            HTTP_CONTENT_HTML HTTP_HEADER_END) +
            web_resp_add_str(sock, temps);
        tcp_sock_close(sock);
    }
    return (n);
}
The ‘req’ parameter is the browser text requesting the resource, which can be parsed to extract the parameter values from a query string.
The ‘oset’ parameter is used when the Web response doesn’t fit into a single response message. It tracks the current position within the data buffer, which normally is equal to the total amount of data so far, but under error conditions, it will step back to an earlier value. A typical usage is to use the value as an index into a data buffer, not forgetting the HTTP response header, which is at the start of the first data block. The following code returns a stream of blocks for each image, until all the image has been sent, which triggers a new multipart header and image capture:
#define TCP_MAXDATA   1400

// Handler for single camera image
int web_cam_handler(int sock, char *req, int oset)
{
    int n = 0, diff;
    static int startime = 0, hlen = 0, dlen = 0;

    if (req)
    {
        hlen = n = web_resp_add_str(sock,
            HTTP_200_OK HTTP_SERVER HTTP_NOCACHE HTTP_CONNECTION_CLOSE
            HTTP_CONTENT_JPEG HTTP_HEADER_END);
        dlen = cam_capture_single();
        n += web_resp_add_data(sock, cam_data, TCP_MAXDATA - n);
    }
    else
    {
        n = MIN(TCP_MAXDATA, dlen + hlen - oset);
        if (n > 0)
            web_resp_add_data(sock, &cam_data[oset - hlen], n);
        else
            tcp_sock_close(sock);
    }
    return (n);
}
Test Web server
web_server.c is a test program to demonstrates the ability of a Web server to return large amounts of data at high speed (over 20 megabits per second). It transfers dummy binary data in text format (base-64) or in raw binary.
It has the following Web pages:
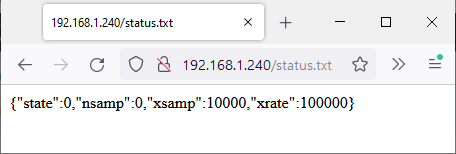
status.txt
This is a simple status message with dummy parameters in JSON format, e.g.
{"state":0,"nsamp":0,"xsamp":10000,"xrate":100000}.
These values are taken from a structure:
typedef struct {
    char name[16];
    int val;
} SERVER_ARG;

SERVER_ARG server_args[] = {
    { "state", 0 },
    { "nsamp", 0 },
    { "xsamp", 10000 },
    { "xrate", 100000 },
    { "" }
};
This demonstrates how dynamic numeric values could be propagated from server to client.
data.txt
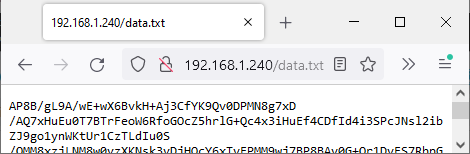
This demonstrates the transfer of a large binary block using base-64 encoding, which converts every 3 bytes into 4 ASCII characters. This technique is used when we want to avoid the complication of handling raw binary.
The microsecond timer on the Pico is used to record the start & ending times of the data transfer, so as to print the data rate on the Pico serial console.
data.bin
This transfers blocks of data in pure binary format, and the throughput rate is reported.
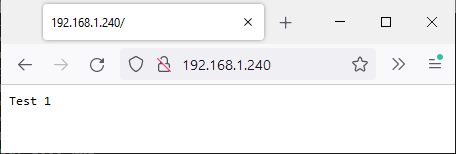
default
The default Web page just returns the string ‘test’ and a number that increments with every access, to show that the page isn’t being cached.
Running the Web server
By default, the server will try to connect to the default Wifi network (‘testnet’) so you will probably need to change the definition at the top of the server code to match your network name and password.
If you are using the Pi development environment described in the introduction, then compiling and running the Web server requires just 2 steps:
make web_server
./prog web_server
When it boots, the server will report its IP address on the serial console, e.g. 192. 168.1.240. Enter that address into a Web browser, to see the (really simple) default page, with a number that increments every time you re-fetch the page:
To see the raw JSON-format status page, access status.txt:
You can also view the start of the base-64 format data, though this isn’t very enlightening:
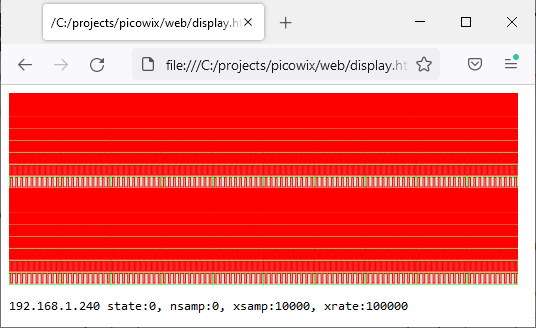
To demonstrate how the status & data information can be decoded and displayed, I have included an HTML file web/display.html, which is an adaptation of my ‘EDLA’ logic analyser code.
Before loading this file, you need to edit the IP address at the top to match your Pico server, and also select binary or base-64 mode for the transfer:
const remip = "192.168.1.240", bin_mode = true;
The resulting display shows a logic-analyser-style display of the incoming data, with the text from the status file underneath. The graphic is much too dense to be any use, but it does show how a large block of data can be transferred and displayed with remarkable speed.
| Project links | |
|---|---|
| Introduction | Project overview |
| Part 1 | Low-level interface; hardware & software |
| Part 2 | Initialisation; CYW43xxx chip setup |
| Part 3 | IOCTLs and events; driver communication |
| Part 4 | Scan and join a network; WPA security |
| Part 5 | ARP, IP and ICMP; IP addressing, and ping |
| Part 6 | DHCP; fetching IP configuration from server |
| Part 7 | DNS; domain name lookup |
| Part 8 | UDP server socket |
| Part 9 | TCP Web server |
| Part 10 | Web camera |
| Source code | Full C source code |
Copyright (c) Jeremy P Bentham 2023. Please credit this blog if you use the information or software in it.
