Raspberry Pi DMA programming in C

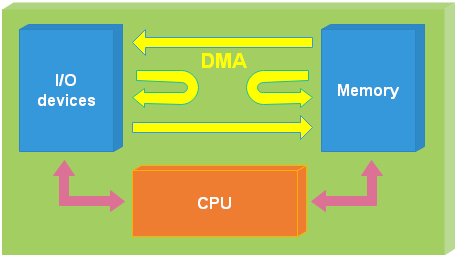
If you need a fast efficient way of moving data around a Raspberry Pi system, Direct Memory Access (DMA) is the preferred option; it works independently of the main processor, doing memory and I/O transfers at high speed.

Programming DMA under Linux can be quite difficult; a device driver is normally used, which needs to be custom-written for a specific application. There are also some Raspberry Pi user-mode programs on the Web that can be run from the command line, but they do need to bypass all the usual memory protections, so require root privileges (e.g. run using ‘sudo’). This means that a minor error in the code can cause random corruption of the processor’s memory, resulting in system instability or a crash.

I couldn’t find any simple explanations and code examples on the Web, so decided to write this blog, documenting all the potential problem areas, with fully commented example code.

I’ll be making extensive use of the Broadcom ‘BCM2835 ARM Peripherals’ document, you can get a copy here. There is also an errata document that is worth reading here.

Address spaces

When creating an executable program, you are (possibly unknowingly) using a ‘virtual’ memory space. The addresses you use are just a temporary fiction, created by the Operating System (OS) for the duration of that program. This allows the OS to make maximum usage of the available RAM; when it gets really crowded, your program may even be pushed out to a ‘swap file’ on disk, so it isn’t even in RAM at all.

This is fine for most user programs, but the DMA controller is a relatively simple piece of hardware, so can not handle the free-for-all nature of virtual memory. It requires everything to be at a known address location, in a memory space known as ‘bus memory’. You may already be familiar with this if you have browsed the BCM2835 document; it describes all the peripherals in terms of their bus addresses.

Accessing peripherals

Raspberry Pi peripheral addressing

Peripherals need to be accessible by the DMA controller (for data transfers) and the user program (for initialisation and configuration). It is easy for the DMA controller to access any peripheral; it just uses the bus address, as given in the documentation. However, the user program runs in its own virtual world, so usually can’t access any peripherals, except through device drivers. To gain direct read/write access, it has to specifically request permission from the OS, by making a call to ‘mmap’ with the physical address of the peripheral we want to access:

// Get virtual memory segment for peripheral regs or physical mem
void *map_segment(void *addr, int size)
{
    int fd;
    void *mem;

    if ((fd = open ("/dev/mem", O_RDWR|O_SYNC|O_CLOEXEC)) < 0)
        FAIL("Error: can't open /dev/mem, run using sudo\n");
    mem = mmap(0, size, PROT_WRITE|PROT_READ, MAP_SHARED, fd, (uint32_t)addr);
    close(fd);
    return(mem);
}

The procedure is slightly strange, in that you have to give the function a file descriptor for /dev/mem, and this requires root privileges, but on reflection this isn’t surprising, since we could do a lot of damage by making unauthorised access to the peripherals, so the OS needs to know we have the authority to do this. There is another descriptor, namely /dev/iomem, that doesn’t require root privileges, but that is confined to the GPIO pins, so we can’t use it for DMA.

The mmap function takes a physical address of the peripheral, and opens a window in virtual memory that our program can access; any read or write to the window is automatically redirected to the peripheral.

I’ve said the mmap function needs a physical address, and you may think this is the same as the bus address, but sadly that isn’t true; there are a total of 3 address spaces: bus, physical and virtual. The conversion between bus & physical is quite easy, but changes depending on the Pi board version: this is the code for Pi 2 or 3, with an example of user-mode GPIO access:

#define PHYS_REG_BASE    0x3F000000
#define GPIO_BASE       (PHYS_REG_BASE + 0x200000)
#define PAGE_SIZE       0x1000

void *virt_gpio_regs
virt_gpio_regs = map_segment((void *)GPIO_BASE, PAGE_SIZE);

#define VIRT_GPIO_REG(a) ((uint32_t *)((uint32_t)virt_gpio_regs + (a)))
#define GPIO_LEV0       0x34

// Get an I/P pin value
uint8_t gpio_in(int pin)
{
    uint32_t *reg = VIRT_GPIO_REG(GPIO_LEV0) + pin/32;
    return (((*reg) >> (pin % 32)) & 1);
}

Accessing memory

Raspberry Pi memory addressing

Memory accesses by the DMA controller are a more complicated, as a known fixed address is required. This can be done by mmap; if it is given a zero address, it will allocate a block of memory, and return a virtual pointer to that block:

#define MMAP_FLAGS (MAP_SHARED|MAP_ANONYMOUS|MAP_NORESERVE|MAP_LOCKED)
mem = mmap(0, size, MMAP_FLAGS, fd, 0);

We now have a virtual memory address, which is fine for our user code to access, but can’t be used by the DMA controller, so we need to look up the physical address by consulting the mapping table:

// Return physical address of virtual memory
void *phys_mem(void *virt)
{
    uint64_t pageInfo;
    int file = open("/proc/self/pagemap", 'r');
    
    if (lseek(file, (((size_t)virt)/PAGE_SIZE)*8, SEEK_SET) != (size_t)virt>>9)
        printf("Error: can't find page map for %p\n", virt);
    read(file, &pageInfo, 8);
    close(file);
    return((void*)(size_t)((pageInfo*PAGE_SIZE)));
}

This physical address can be converted to a bus address, and given to the DMA controller, but you will find the end result is quite unreliable; there is a disconnect between the data that the user program is writing, and the values that the DMA controller is reading; the two don’t match up, unless you include very significant delays in the code. This is due to the CPU caching memory accesses.

Memory caching

Raspberry Pi cache areas

Caches are used to temporarily store data values within the CPU, so they can be accessed much faster than main memory. Normally they are completely transparent to the software; the CPU manipulates the cached value of a variable, then the value is written out to main memory after a suitable delay. The length of this delay is dependant on the CPU workload, but may be around 1 second.

This is a major problem when working with DMA; it fetches data and descriptors directly from memory, but if that data was prepared less than a second ago, it may only be in the CPU cache; the memory will still have random values from a previous program, making the DMA controller behave in a totally unpredictable way.

This has the potential to be very nasty problem, since it will come & go depending on the CPU workload and other programs, so can be really difficult to diagnose. We must be absolutely sure that all the cached data has been written to memory before starting DMA. There are various ways this can be done in theory, for example there is a GCC command:

void __clear_cache(void *start, void *end)

however this seems to be more applicable to instruction than data caches, and I didn’t have any success using it.

Another approach is to use the aliases in bus memory, as shown in the diagram above. Basically the same memory appears 4 times in the memory map, with varying degrees of caching, so if the bus address is Cxxxxxxx hex, the memory is uncached. This gives rise to the method:

Allocate memory using mmap with phys addr 0, get virt addr
Convert the virt addr to phys & bus addr
De-allocate the memory
Allocate memory using mmap with same phys addr, in uncached area

I did quite a bit of experimentation with this method, and wasn’t convinced it always works; it was still necessary to include arbitrary delays in the code, otherwise there was still a tendency to sometimes crash.

Eventually my searches for a completely reliable method of getting uncached memory lead me to the VideoCore Mailbox.

VideoCore graphics processor

It may seem strange that I’m tinkering with the graphics processor in order to get uncached memory, but the VideoCore IV Graphics Processing Unit (GPU) controls some primary functionality of the RPi, including the split between main & video memories.

Communication with the GPU is via a confusingly-named ‘mailbox’; this is nothing to do with emails, it is just an ioctl calling mechanism, e.g.

// Open mailbox interface, return file descriptor
int open_mbox(void)
{
   int fd;

   if ((fd = open("/dev/vcio", 0)) < 0)
       FAIL("Error: can't open VC mailbox\n");
   return(fd);
}
// Send message to mailbox, return first response int, 0 if error
uint32_t msg_mbox(int fd, VC_MSG *msgp)
{
    uint32_t ret=0, i;

    for (i=msgp->dlen/4; i<=msgp->blen/4; i+=4)
        msgp->uints[i++] = 0;
    msgp->len = (msgp->blen + 6) * 4;
    msgp->req = 0;
    if (ioctl(fd, _IOWR(100, 0, void *), msgp) < 0)
        printf("VC IOCTL failed\n");
    else if ((msgp->req&0x80000000) == 0)
        printf("VC IOCTL error\n");
    else if (msgp->req == 0x80000001)
        printf("VC IOCTL partial error\n");
    else
        ret = msgp->uints[0];
    return(ret);
}
// Allocate memory on PAGE_SIZE boundary, return handle
uint32_t alloc_vc_mem(int fd, uint32_t size, VC_ALLOC_FLAGS flags)
{
    VC_MSG msg={.tag=0x3000c, .blen=12, .dlen=12,
        .uints={PAGE_ROUNDUP(size), PAGE_SIZE, flags}};
    return(msg_mbox(fd, &msg));
}
// Lock allocated memory, return bus address
void *lock_vc_mem(int fd, int h)
{
    VC_MSG msg={.tag=0x3000d, .blen=4, .dlen=4, .uints={h}};
    return(h ? (void *)msg_mbox(fd, &msg) : 0);
}

The ioctl call requires a 108-byte structure with the command plus data; it returns the response in the same structure:

// Mailbox command/response structure
typedef struct {
    uint32_t len,   // Overall length (bytes)
        req,        // Zero for request, 1<<31 for response
        tag,        // Command number
        blen,       // Buffer length (bytes)
        dlen;       // Data length (bytes)
        uint32_t uints[32-5];   // Data (108 bytes maximum)
} VC_MSG __attribute__ ((aligned (16)));

As you can see, the mailbox functions are quite easy to use; for details of other functionality, see the documentation.

So at last we have a reliable source of uncached memory; for simplicity my software just allocates a single block, which is then subdivided into the control blocks and data needed by the DMA controller.

Code optimisation

One final issue needs to be mentioned in this context; if compiler optimisation is enabled (e.g. gcc command line options -O2 or -O3) then some of the memory accesses may be optimised out, leading to confusing results. For example, you may be using DMA to transfer a data value, and are polling the destination in a tight loop to see when the transfer is complete.

int *destp = ...    // Pointer to somewhere in uncached memory
*destp = 0;
while (*desp == 0)  // While DMA data not received..
    sleep(1);       // ..sleep

On the first poll cycle, the code will read the memory, but subsequent read cycles may be optimised out, so the CPU just re-uses the same data value without re-checking memory.

The solution is simple: declare the variable as volatile, e.g.

volatile int *destp = ...

This ensures that the CPU will always access the memory on every read cycle.

DMA controller

The primary configuration mechanism for the DMA controller is a Control Block (CB). This fully defines the required transfer, including source & destination addresses, data lengths, and the like:

// DMA control block (must be 32-byte aligned)
typedef struct {
    uint32_t ti,    // Transfer info
        srce_ad,    // Source address
        dest_ad,    // Destination address
        tfr_len,    // Transfer length
        stride,     // Transfer stride
        next_cb,    // Next control block
        debug,      // Debug register
        unused;
} DMA_CB __attribute__ ((aligned(32)));
#define DMA_CB_DEST_INC (1<<4)
#define DMA_CB_SRC_INC  (1<<8)

The next_cb address means that you can create a chain of CBs; the controller will work through them all until it encounters a next_cb value of zero.

1st example: memory-to-memory transfer

We’ll start with a really simple operation: a memory-to-memory transfer.

// DMA memory-to-memory test
int dma_test_mem_transfer(void)
{
    DMA_CB *cbp = virt_dma_mem;
    char *srce = (char *)(cbp+1);
    char *dest = srce + 0x100;

    strcpy(srce, "memory transfer OK");
    memset(cbp, 0, sizeof(DMA_CB));
    cbp->ti = DMA_CB_SRC_INC | DMA_CB_DEST_INC;
    cbp->srce_ad = BUS_DMA_MEM(srce);
    cbp->dest_ad = BUS_DMA_MEM(dest);
    cbp->tfr_len = strlen(srce) + 1;
    start_dma(cbp);
    usleep(10);
#if DEBUG
    disp_dma();
#endif
    printf("DMA test: %s\n", dest[0] ? dest : "failed");
    return(dest[0] != 0);
}

The variable virt_dma_mem is pointing to an area of uncached memory, which has been used to house a control block, and the source & destination arrays. The DMA controller starts with that control block, and after a brief delay, the destination is checked to see if the data has been transferred.

I originally thought that the DMA transfer would be so fast that no delay is required, but this isn’t true; some delay is necessary, but even a zero delay is sufficient, i.e. usleep(0), so the 10 microseconds I’ve used is more than adequate.

2nd example: memory-to-GPIO transfer

Assuming the above example works, it is time to try writing to a peripheral, namely a GPIO pin, that can be connected to an LED to provide a simple flashing indication.

On most CPUs you’d write 1 or 0 to a GPIO register to turn the LED on or off, but the Broadcom hardware doesn’t work that way; there is on register to turn it on, and another to turn it off. So we just need to flip the register address between DMA transfers, and the LED will flash.

// DMA memory-to-GPIO test: flash LED
void dma_test_led_flash(int pin)
{
    DMA_CB *cbp=virt_dma_mem;
    uint32_t *data = (uint32_t *)(cbp+1), n;

    printf("DMA test: flashing LED on GPIO pin %u\n", pin);
    memset(cbp, 0, sizeof(DMA_CB));
    *data = 1 << pin;
    cbp->tfr_len = 4;
    cbp->srce_ad = BUS_DMA_MEM(data);
    for (n=0; n<16; n++)
    {
        usleep(200000);
        cbp->dest_ad = BUS_GPIO_REG(n&1 ? GPIO_CLR0 : GPIO_SET0);
        start_dma(cbp);
    }
}

As before, the CB and source data are placed in uncached memory, but the transfer destination is either the ‘set’ or ‘clear’ GPIO registers.

After each on/off transition, the DMA stops, and needs to be restarted with the modified control block.

3rd example: timed triggering

The previous 2 examples are useful demonstrations that DMA is working, but have little practical application since they require significant CPU intervention to keep them running. What we really need is a way of triggering the DMA cycles from a timer, so the transfers carry on automatically while the CPU is doing other tasks.

Unlike most microcontrollers, the Broadcom hardware has no real timers, but it does have a Pulse-Width Modulation (PWM) controller, that can be used instead; it can be programmed to request a data update on a regular basis, i.e. issue a DMA request, and once the update data is received, wait for a fixed time before issuing another request.

That gives us a regular stream of DMA requests at specific intervals, but how do we use that to toggle an LED pin? The answer is that we create 4 control blocks in an endless circular loop:

CB0: clear LED
CB1: write data to PWM controller
CB2: set LED
CB3: write data to PWM controller

You need to bear in mind that the DMA controller will continue processing CBs while its request line is asserted. If we didn’t have CB1 & 3, the DMA cycles would be running continuously, and toggling the LED very fast; this isn’t recommended, since it does use up a lot of memory bandwidth, but on the few occasions I’ve done that, the system seemed to cope quite well, and didn’t crash. With the above arrangement, the controller will execute CB0 & 1, then delay, CB2 & 3, another delay, CB 0 & 1, and so on.

// PWM clock frequency and range (FREQ/RANGE = LED flash freq)
#define PWM_FREQ        100000
#define PWM_RANGE       20000

// DMA trigger test: fLash LED using PWM trigger
void dma_test_pwm_trigger(int pin)
{
    DMA_CB *cbs=virt_dma_mem;
    uint32_t n, *pindata=(uint32_t *)(cbs+4), *pwmdata=pindata+1;

    printf("DMA test: PWM trigger, ctrl-C to exit\n");
    memset(cbs, 0, sizeof(DMA_CB)*4);
    // Transfers are triggered by PWM request
    cbs[0].ti = cbs[1].ti = cbs[2].ti = cbs[3].ti = (1 << 6) | (DMA_PWM_DREQ << 16);
    // Control block 0 and 2: clear & set LED pin, 4-byte transfer
    cbs[0].srce_ad = cbs[2].srce_ad = BUS_DMA_MEM(pindata);
    cbs[0].dest_ad = BUS_GPIO_REG(GPIO_CLR0);
    cbs[2].dest_ad = BUS_GPIO_REG(GPIO_SET0);
    cbs[0].tfr_len = cbs[2].tfr_len = 4;
    *pindata = 1 << pin;
    // Control block 1 and 3: update PWM FIFO (to clear DMA request)
    cbs[1].srce_ad = cbs[3].srce_ad = BUS_DMA_MEM(pwmdata);
    cbs[1].dest_ad = cbs[3].dest_ad = BUS_PWM_REG(PWM_FIF1);
    cbs[1].tfr_len = cbs[3].tfr_len = 4;
    *pwmdata = PWM_RANGE / 2;
    // Link control blocks 0 to 3 in endless loop
    for (n=0; n<4; n++)
        cbs[n].next_cb = BUS_DMA_MEM(&cbs[(n+1)%4]);
    // Enable PWM with data threshold 1, and DMA
    init_pwm(PWM_FREQ);
    *VIRT_PWM_REG(PWM_DMAC) = PWM_DMAC_ENAB|1;
    start_pwm();
    start_dma(&cbs[0]);
    // Nothing to do while LED is flashing
    sleep(4);
}

PWM clock setting

Before leaving the code, it is worth mentioning another area of difficulty: setting the clock frequency of the PWM controller. I arbitrarily chose 100 kHz, since that could be divided by 20,000 to flash the LED at 5 Hz.

The recommended way of setting the clock is using the VideoCore mailbox:

void set_vc_clock(int fd, int id, uint32_t freq)
{
    VC_MSG msg1={.tag=0x38001, .blen=8, .dlen=8, .uints={id, 1}};
    VC_MSG msg2={.tag=0x38002, .blen=12, .dlen=12, .uints={id, freq, 0}};
    msg_mbox(fd, &msg1);
    msg_mbox(fd, &msg2);
}

This method works sometimes, but not always; it can take several attempts to change from one frequency to another, and I don’t understand why.

A fall-back option is to write to the (undocumented) timer registers, which is the method I use by default:

#define USE_VC_CLOCK_SET 0

#if USE_VC_CLOCK_SET
    set_vc_clock(mbox_fd, PWM_CLOCK_ID, freq);
#else
    int divi=(CLOCK_KHZ*1000) / freq;
    *VIRT_CLK_REG(CLK_PWM_CTL) = CLK_PASSWD | (1 << 5);
    while (*VIRT_CLK_REG(CLK_PWM_CTL) & (1 << 7)) ;
    *VIRT_CLK_REG(CLK_PWM_DIV) = CLK_PASSWD | (divi << 12);
    *VIRT_CLK_REG(CLK_PWM_CTL) = CLK_PASSWD | 6 | (1 << 4);
    while ((*VIRT_CLK_REG(CLK_PWM_CTL) & (1 << 7)) == 0) ;
#endif
    usleep(100);

The PWM controller seems to be very sensitive to changes in its clock frequency, so before any change, it is essential to disable it, and wait some time before re-enabling. On one occasion, it locked up completely and just wouldn’t work until I re-powered the board, so care is needed when modifying the clocking code – it is certainly an area that merits further investigation.

Running the code

There is a single source file rpi_dma_test.c on Github here.

You’ll need to change the definition at the top depending on the RPi version you are using:

//#define PHYS_REG_BASE  0x20000000  // Pi Zero or 1
#define PHYS_REG_BASE    0x3F000000  // Pi 2 or 3
//#define PHYS_REG_BASE  0xFE000000  // Pi 4

Then the code can be compiled with GCC, and run with ‘sudo’:

gcc -Wall -o rpi_dma_test rpi_dma_test.c
sudo ./rpi_dma_test

You can optionally compile with -O2 or -O3 optimisation.

To view the results you need to connect an LED (with a 330 ohm resistor in series) to ground and LED_PIN, which I’ve set to GPIO pin 21. This is at the far end of the I/O connector, conveniently next to a ground pin.

Raspberry Pi LED connection

The positive leg of the LED goes to the output pin, which is nearest the camera.

The usual warnings apply when running a program with root privileges -there is a security risk, since it has unrestricted access to all system functions.

To see DMA being used for data acquisition, take a look at my next post.

Update

Since I first wrote this post, I’ve been using DMA in various projects, most recently an ADC streaming application, and need to clarify a few items in this post based on that experience.

Choice of DMA channel number

It is necessary to pick an unused channel, to avoid clashes with the operating system. There is various contradictory information posted on the Internet, so I wrote my own DMA-detection utility, which suggests that the Pi 4 (or 400) uses channels 2, 11, 12, 13, 14, and the earlier boards use 0, 2, 4, 6, so the choice of channel 5 in this post isn’t a bad one – but of course this might change in a future OS release.

PWM master clock frequency

The CLOCK_KHZ value of 250000 is correct for Raspberry Pi versions 0 – 3, but versions 4 & 400 use a value of 375000.

Videocore memory allocation

I have been using MEM_FLAG_DIRECT when allocating the uncached memory, but subsequent tests suggest that MEM_FLAG_COHERENT is a better bet when working with fast-changing data – but this isn’t an issue when dealing with with slow-changing I/O as in these examples.

Structuring the DMA data

The method I’ve used to define the data & CBs in uncached memory is a bit messy, so I’ve been looking for a cleaner way to do this, to reduce the likelihood of errors.

I’ve achieved this by using a single structure to house the data and Control Blocks, the latter being at the front of the structure so they’re on a 32-byte boundary. The steps then become:

  1. Prepare the CBs and data in user memory.
  2. Copy the CBs and data across to uncached memory
  3. Start the DMA controller
  4. Start the DMA pacing

Here is the PWM-triggered LED flash function, rewritten to use the new method; hopefully you’ll find it easier to understand and modify.

// DMA control block macros
#define NUM_CBS         4
#define GPIO(r)         BUS_GPIO_REG(r)
#define PWM(r)          BUS_PWM_REG(r)
#define MEM(m)          BUS_DMA_MEM(m)
#define CBS(n)          BUS_DMA_MEM(&dp->cbs[(n)])
#define PWM_TI          ((1 << 6) | (DMA_PWM_DREQ << 16))

// Control Blocks and data to be in uncached memory
typedef struct {
    DMA_CB cbs[NUM_CBS];
    uint32_t pindata, pwmdata;
} DMA_TEST_DATA;

// Updated DMA trigger test, using data structure
void dma_test_pwm_trigger(int pin)
{
    DMA_TEST_DATA *dp=virt_dma_mem;
    DMA_TEST_DATA dma_data = {
        .pindata=1<<pin, .pwmdata=PWM_RANGE/2,
        .cbs = {
          // TI      Srce addr          Dest addr        Len   Next CB
            {PWM_TI, MEM(&dp->pindata), GPIO(GPIO_CLR0), 4, 0, CBS(1), 0},  // 0
            {PWM_TI, MEM(&dp->pwmdata), PWM(PWM_FIF1),   4, 0, CBS(2), 0},  // 1
            {PWM_TI, MEM(&dp->pindata), GPIO(GPIO_SET0), 4, 0, CBS(3), 0},  // 2
            {PWM_TI, MEM(&dp->pwmdata), PWM(PWM_FIF1),   4, 0, CBS(0), 0},  // 3
        }
    };
    memcpy(dp, &dma_data, sizeof(dma_data));    // Copy data into uncached memory
    init_pwm(PWM_FREQ);                         // Enable PWM with DMA
    *VIRT_PWM_REG(PWM_DMAC) = PWM_DMAC_ENAB|1;
    start_dma(&dp->cbs[0]);                     // Start DMA
    start_pwm();                                // Start PWM
    sleep(4);                                   // Do nothing while LED flashing
}

Copyright (c) Jeremy P Bentham 2020. Please credit this blog if you use the information or software in it.

Raspberry Pi bare-metal programming using Alpha

‘Bare-metal’ is programming without an operating system – running the code directly on the hardware, without the usual device drivers.

I’ve been developing a bare-metal driver for the WiFi chip on the Raspberry Pi ZeroW, and needed a method of downloading & debugging the code. Alpha by Farjump seemed ideal for the purpose; it is a small remote GDB server, that can be controlled by a Windows or Linux PC, using a simple 2-wire serial link.

In this blog I’ll describe how to set up Alpha, and give some tips to maximise the functionality of this excellent application. I’ve been using Windows as a development platform, so this text is biased in that direction, but much of the information is applicable to Linux as well.

Limitations

So far, I have only had success running Alpha on the original Pi version 1, and the ZeroW; for example, it didn’t work on version 3 hardware. This may be due to errors on my part; I’m not sure which board versions are actually supported by the current release.

Hardware connection

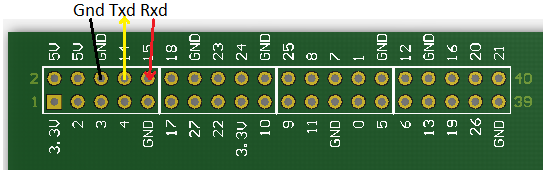
You need a 3-wire serial connection (ground, transmit & receive) at 3.3-volt logic levels. Any USB-to-serial adaptor should work, so long as it has a 3.3V output, not 5 volt or RS-232.

I use an FTDI cable for the purpose, the TTL-232R-RPi, which has just black, yellow and red wires connected as follows:

Raspberry Pi Alpha connections

These are labelled from the perspective of the Raspberry Pi, so the Txd line will go to Rxd on your serial adaptor, and vice-versa. Take care when connecting, due to the closeness of the 5 volt power pins; they could cause serious damage.

Installation

Clone or download Alpha from https://github.com/farjump/raspberry-pi

You just need 4 files in the root directory of the SDHC card that is plugged into the Raspberry Pi:

An install script for Linux is provided (scripts/install-rpi-boot.sh) but I had no luck with this, so had to do a manual install. Alpha.bin and config.txt come from the Alpha distribution ‘boot’ directory, bootcode.bin and start.elf are copied from the root directory of a Raspbian distribution.

The Raspberry Pi boot directory is FAT32 formatted, so you don’t have to run Linux; you can plug the SDHC card into a USB adaptor on a Windows PC, and copy the required files across.

When you boot the system, nothing seems to happen; you need to use the serial link to check alpha is working.

Compiler

The compiler I’ve been using is gcc-arm-none-eabi, version 7-2018-q2-update. Installation on Raspbian Buster just requires:

sudo apt install gcc-arm-none-eabi

On Windows, download from here; this places the tools in the directory

C:\Program Files (x86)\GNU Tools Arm Embedded\7 2018-q2-update\bin

Check that this directory in included in your search path by opening a command window, and typing

arm-none-eabi-gcc -v
arm-none-eabi-gdb -v

If not found, close the window, add to the PATH environment variable, and retry.

For more complicated projects, you’ll probably be using Makefiles, and on Windows, will need to install ‘make’ from here. As with GCC, check that it is included in your executable path by opening a new command window, and typing

make -v

Building a project

The SDK files are in the sdk sub-directory of the Alpha distribution; for simplicity, you can just copy it to create an identical sdk sub-directory in your project directory.

We need something to compile, so here is a simple program alpha_test.c to flash the LED on a Pi ZeroW at 1 Hz.

// Simple test of Raspberry Pi bare-metal I/O using Alpha
// From iosoft.blog, copyright (c) Jeremy P Bentham 2020

#include <stdint.h>
#include <stdio.h>

#define REG_BASE    0x20000000      // Pi Zero

#define GPIO_BASE   (REG_BASE + 0x200000)
#define GPIO_MODE0  (uint32_t *)GPIO_BASE
#define GPIO_SET0   (uint32_t *)(GPIO_BASE + 0x1c)
#define GPIO_CLR0   (uint32_t *)(GPIO_BASE + 0x28)
#define GPIO_LEV0   (uint32_t *)(GPIO_BASE + 0x34)

#define GPIO_REG(a) ((uint32_t *)a)

#define USEC_BASE   (REG_BASE + 0x3000)
#define USEC_REG()  ((uint32_t *)(USEC_BASE+4))

#define GPIO_IN     0
#define GPIO_OUT    1

#define LED_PIN     47

void gpio_mode(int pin, int mode);
void gpio_out(int pin, int val);
uint8_t gpio_in(int pin);
int ustimeout(int *tickp, int usec);

int main(int argc, char *argv[])
{
    int ticks=0;
    
    gpio_mode(LED_PIN, GPIO_OUT);
    ustimeout(&ticks, 0);
    printf("\nAlpha test");
    while (1)
    {
        if (ustimeout(&ticks, 500000))
        {
            gpio_out(LED_PIN, !gpio_in(LED_PIN));
            putchar('.');
            fflush(stdout);
        }   
    }
}

// Set input or output
void gpio_mode(int pin, int mode)
{
    uint32_t *reg = GPIO_REG(GPIO_MODE0) + pin / 10, shift = (pin % 10) * 3;

    *reg = (*reg & ~(7 << shift)) | (mode << shift);
}

// Set an O/P pin
void gpio_out(int pin, int val)
{
    uint32_t *reg = (val ? GPIO_REG(GPIO_SET0) : GPIO_REG(GPIO_CLR0)) + pin/32;

    *reg = 1 << (pin % 32);
}

// Get an I/P pin value
uint8_t gpio_in(int pin)
{
    uint32_t *reg = GPIO_REG(GPIO_LEV0) + pin/32;

    return (((*reg) >> (pin % 32)) & 1);
}

// Return non-zero if timeout
int ustimeout(int *tickp, int usec)
{
    int t = *USEC_REG();

    if (usec == 0 || t - *tickp >= usec)
    {
        *tickp = t;
        return (1);
    }
    return (0);
}

// EOF

For details of the built-in peripherals, see the ‘BCM2835 ARM Peripherals’ document, available here.

My code polls a microsecond time register, toggling the LED when it reaches a certain value. This allows the CPU to do other things while waiting for a timeout, for example, polling other peripherals. It uses a really handy 32-bit counter that is clocked at 1 MHz; surprisingly, the same counter can be used on Linux, though in that case, you have to ask for permission from the OS to use it (e.g. using mmap).

To build the program, a makefile isn’t essential, it can be done with a single command line:

arm-none-eabi-gcc -specs=sdk/Alpha.specs -mfloat-abi=hard -mfpu=vfp -march=armv6zk -mtune=arm1176jzf-s -g3 -ggdb -Wall -Wl,-Tsdk/link.ld -Lsdk -Wl,-umalloc -o alpha_test.elf alpha_test.c

This produces the executable file alpha_test.elf. If your project involves other source files, they can be appended to the command line.

Running the program

Alpha provides the functionality of a remote gdb server, so we need to run a local instance of arm-none-eabi-gdb in remote mode. It is convenient to group all the gdb settings in a single file, named run.gdb:

source sdk/alpha.gdb
set serial baud 115200
target remote COM7
load
continue

On Linux, the serial port will be something like /dev/ttyUSB0 and you may need to set specific permissions for a user-mode program to access it.

We can now execute the code by running gdb with the settings, and executable filename:

arm-none-eabi-gdb -x run.gdb alpha_test.elf

If all is well, the code should load and run, flashing the ZeroW on-board LED at 1 Hz:

Loading section .entry, size 0x14f lma 0x8000
Loading section .text, size 0xaf00 lma 0x8150
Loading section .init, size 0x18 lma 0x13050
Loading section .fini, size 0x18 lma 0x13068
Loading section .rodata, size 0x310 lma 0x13080
Loading section .ARM.exidx, size 0x8 lma 0x13390
Loading section .eh_frame, size 0x4 lma 0x13398
Loading section .init_array, size 0x8 lma 0x2339c
Loading section .fini_array, size 0x4 lma 0x233a4
Loading section .data, size 0x9b0 lma 0x233a8
Start address 0x81c0, load size 48471
Transfer rate: 9 KB/sec, 850 bytes/write.

Alpha test............

Hit ctrl-C to halt the program, then ‘q’ to quit from GDB.

Unfortunately, if all is not well, there are no helpful error messages. If the target system is completely unresponsive, gdb will stall after the ‘reading symbols’ message; if it sees incorrect characters on the serial link it might report ‘a problem internal to GDB has been detected’; either way, the only option is to re-check the files on the SDHC card, and the serial connections.

Speedup

The upload is quite slow, so I wanted to speed it up. The limiting factor is the 115 kbaud serial speed, which is hard-coded into Alpha. However, gdb does have full access to all the on-chip registers, so it is possible to change the baud rate using GDB remote commands before downloading.

The commands have to be sent at 115 kbit/s to change the rate, and GDB must be reconfigured to use the serial link at the high speed. There are various ways this can be done; I decided to write a small program, alpha_speedup.py, that is compatible with Python 2.7 and 3.x:

# Utility for RPi Alpha to increase remote GDB baud rate
# From iosoft.blog, copyright (c) Jeremy P bentham 2020
# Requires pyserial package

import sys, serial, time

# Defaults
serport  = "COM7"
verbose  = False

# Settings
OLD_BAUD    = 115200
NEW_BAUD    = 921600
TIMEOUT     = 0.2
SYS_CLOCK   = 250e6

# BCM2835 UART baud rate divisor
uart_div    = int(round((SYS_CLOCK / (8 * NEW_BAUD)) - 1))

# GDB remote commands
high_speed  = "mw32 0x20215068 %u" % uart_div
qsupported  = "qSupported"

# Send command, return response
def cmd_resp(ser, cmd):
    txd = frame(cmd)
    if verbose:
        print("Tx: %s" % txd)
    ser.write(txd.encode('latin'))
    rxd = str(ser.read(1468))
    if verbose:
        print("Rx: %s" % rxd)
    resp = rxd.partition('$')
    return resp[2].partition('#')[0]

# Acknowledge a response
def ack_resp(ser):
    ser.write('+'.encode('latin'))
    if verbose:
        print("Tx: +")

# Return string, given hex values
def hex_str(hex):
    return bytearray.fromhex(hex).decode()

# Return remote hex command string
def cmd_hex(cmd):
    return "qRcmd,%s" % "".join([("%02x" % ord(c)) for c in cmd])

# Return framed data
def frame(data):
    return "$%s#%02x" % ("".join([escape(c) for c in data]), csum(data))

# Escape a character in the message
def escape(c):
    return c if c not in "#$}" else '}'+chr(ord(c)^0x20)

# GDB checksum calculation
def csum(data):
    return 0xff & sum([ord(c) for c in data])

# Open serial port
def ser_open(port, baud):
    try:
        ser = serial.Serial(port, baud, timeout=TIMEOUT)
    except:
        print("Can't open serial port %s" % port)
        sys.exit(1)
    return ser
        
# Close serial port
def ser_close(ser):
    if ser:
        ser.close()

if __name__ == "__main__":
    opt = None
    for arg in sys.argv[1:]:
        if len(arg)==2 and arg[0]=="-":
            opt = arg.lower()
            if opt == "-v":
                verbose = True
                opt = None
        elif opt == '-c':
            serport = arg
            opt = None
    print("Opening serial port %s at %u baud" % (serport, OLD_BAUD))
    ser = ser_open(serport, OLD_BAUD);
    cmd_resp(ser, "")
    ack_resp(ser)
    if cmd_resp(ser, qsupported):
        ack_resp(ser)
        print("Setting %u baud" % NEW_BAUD)
        cmd_resp(ser, cmd_hex(high_speed))
    time.sleep(0.01)
    print("Reopening at %u baud" % NEW_BAUD)
    ser_close(ser)
    ser = ser_open(serport, NEW_BAUD);
    ack_resp(ser)
    if cmd_resp(ser, qsupported):
        ack_resp(ser)
        print("Target system responding OK")
        time.sleep(0.01)
    else:
        print("No response from target system")
#EOF

For details of the commands, see the GDB remote specification. One unusual feature is that all responses from the target system have to be acknowledged with a ‘+’ character, otherwise they are re-sent 14 times. This is a bit awkward since the baud-rate change command acts immediately, so although it is sent at 115 kbit/s, the response is at 921600; we need to quickly close & reopen the port at the higher speed to send the acknowledgement.

I’ve hard-coded a Windows port (COM7) which will need to be changed for your setup, or use the command-line -c option to set something else (e.g. /dev/ttyUSB0). The -v option enables a verbose mode, that shows the commands and responses.

The second line of the GDB configuration file run.gdb needs to be changed to reflect the increased speed:

set serial baud 921600

The speedup program must always be run before gdb:

python alpha_speedup.py
arm-none-eabi-gdb -x run.gdb alpha_test.elf

Other features

Here are some things I’ve discovered about Alpha that might be useful:

ctrl-C: in my experimentation, you can only use ctrl-C to interrupt the program if it is printing to the console. There is presumably a way round this (apart from adding unnecessary print statements) but I don’t know what that is.

Console output: this works well, any print statements are echoed to the GDB console, but it does slow down the code a lot; if you need high speed, it is best to buffer the serial output in your program, then print it at the end.

GDB break: if you just want to quickly run a program, see the result, and exit GDB, this can be done by setting a breakpoint on a specific function, and setting an action when that is triggered, e.g. add the following lines to the end of run.gdb:

break gdb_break
commands 1
  kill
  quit
end

Now when the function ‘gdb_break’ is executed, GDB will exit back to the command-line. I add a matching dummy function to the C code:

// Dummy function to trigger gdb breakpoint
void gdb_break(void)
{
} // Trigger GDB break

..and just call this function if I want to halt the program and exit.

Copyright (c) Jeremy P Bentham 2020. Please credit this blog if you use the information or software in it.

ARM GCC Lean: programming and debugging the Nordic NRF52

The nRF52832 is an ARM Cortex M4 chip with an impressive range of peripherals, including an on-chip 2.4 GHz wireless transceiver. Nordic supply a comprehensive SDK with plenty of source-code examples; they are fully compatible with the GCC compiler, but there is little information on how to program and debug a target system using open-source tools such as the GDB debugger, or the OpenOCD JTAG/SWD programmer.

This blog will show you how to compile, program and debug some simple examples using the GNU ARM toolchain; the target board is the NRF52832 Breakout from Sparkfun, and the programming is done via a Nordic development board, or OpenOCD on a Raspberry Pi. Compiling & debugging is with GCC and GDB, running on Windows or Linux.

Source files

All the source files are in an ‘nrf_test’ project on GitHub; if you have Git installed, change to a suitable project directory and enter:

git clone https://github.com/jbentham/nrf_test

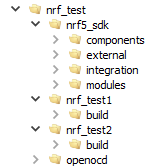
Alternatively you can download a zipfile from github here. You’ll also need the nRF5 15.3.0 SDK from the Nordic web site. Some directories need to be copied from the SDK to the project’s nrf5_sdk subdirectory; you can save disk space by only copying components, external, integration and modules as shown in the graphic above.

Windows PC hardware

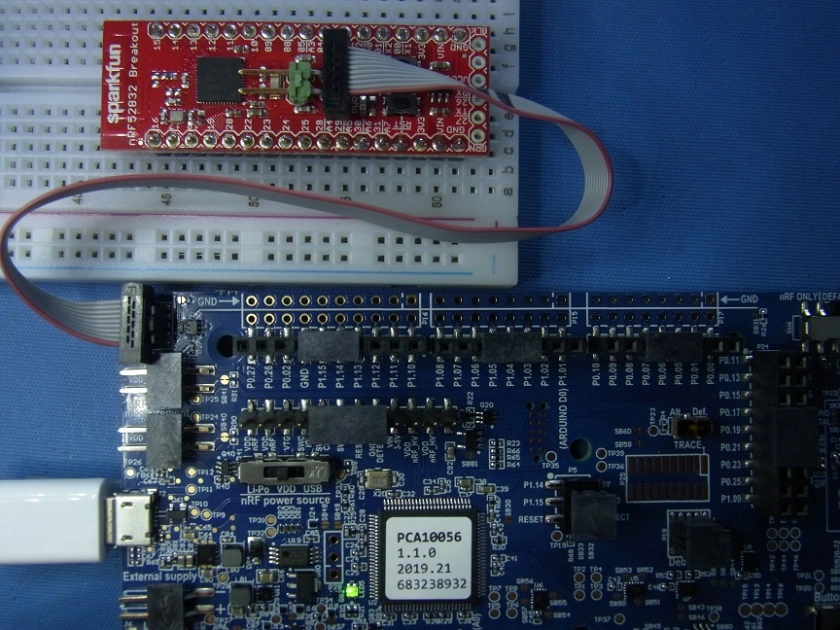
Cortex Debug Connection to a Nordic evaluation board.

The standard programming method advocated by Nordic is to use the Segger JLink adaptor that is incorporated in their evaluation boards, and the Windows nRF Command Line Tools (most notably, the nrfjprog utility) that can be downloaded from their Web site.

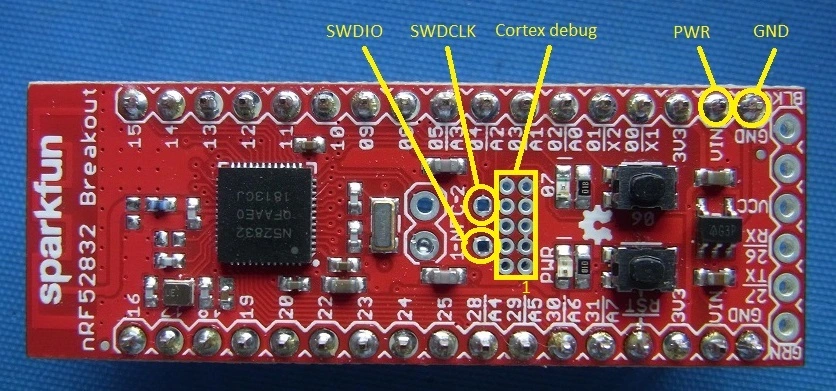
Connection between the evaluation board and target system can be a bit tricky; the Sparkfun breakout board has provision for a 10-way Cortex Debug Connector, and adding the 0.05″ pitch header does require reasonable soldering skills. However, when that has been done, a simple ribbon cable can be used to connect the two boards, with no need to change any links or settings from their default values.

One quirk of this arrangement is that the programming adaptor detects the 3.3V power from the target board in order to switch the SWD interface from the on-board nRF52 chip to the external device. This has the unfortunate consequence that if you forget to power up the target board, you’ll be programming the wrong device, which can be confusing.

The JLink adaptor isn’t the only programming option for Windows; you can use a Raspberry Pi with OpenOCD installed…

Raspberry Pi hardware

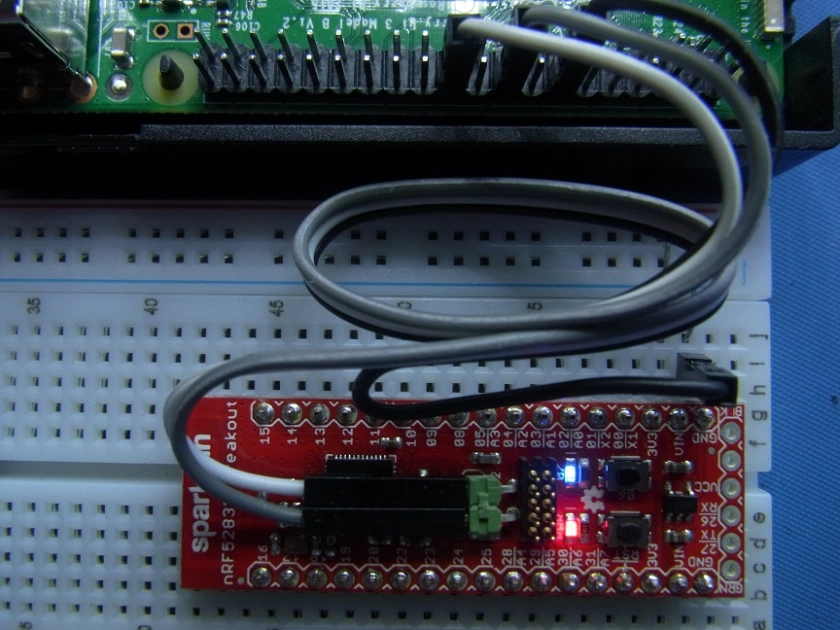
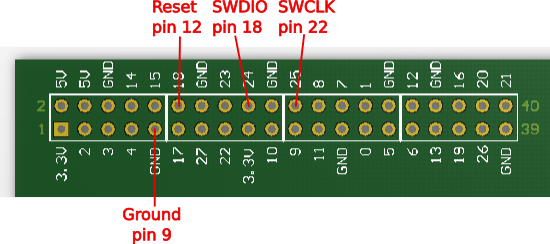
Raspberry Pi SWD interface (pin 1 is top right in this photo)

In a previous blog, I described the use of OpenOCD on the raspberry Pi; it can be used as a Nordic device programmer, with just 3 wires: ground, clock and data – the reset line isn’t necessary. The breakout board needs a 5 volt supply which could be taken from the RPi, but take care: accidentally connecting a 5V signal to a 3.3V input can cause significant damage.

Rasberry Pi SWD connections
NRF52832 breakout SWD connections

Install OpenOCD as described in the previous blog; I’ve included the RPi and SWD configuration files in the project openocd directory, so for the RPi v2+, run the commands:

cd nrf_test
sudo openocd -f openocd/rpi2.cfg -f openocd/nrf52_swd.cfg

The response should be..

BCM2835 GPIO config: tck = 25, tms = 24, tdi = 23, tdo = 22

Info : Listening on port 6666 for tcl connections
Info : Listening on port 4444 for telnet connections
Info : BCM2835 GPIO JTAG/SWD bitbang driver
Info : JTAG and SWD modes enabled
Info : clock speed 1001 kHz
Info : SWD DPIDR 0x2ba01477
Info : nrf52.cpu: hardware has 6 breakpoints, 4 watchpoints
Info : Listening on port 3333 for gdb connections

The DPIDR value of 0x2BA01477 is correct for the nRF52832 chip; if any other value appears, there is a problem: check the wiring.

Windows development tools

The recommended compiler toolset for the SDK files is gcc-arm-none-eabi, version 7-2018-q2-update, available here. This places the tools in the directory

C:\Program Files (x86)\GNU Tools Arm Embedded\7 2018-q2-update\bin

Check that this directory in included in your search path by opening a command window, and typing

arm-none-eabi-gcc  -v

If not found, close the window, add to the PATH environment variable, and retry.

You will also need to install Windows ‘make’ from here. At the time of writing, the version is 3.81, but I suspect most modern versions would work fine. As with GCC, check that it is included in your executable path by opening a new command window, and typing

make -v

Linux development tools

A Raspberry Pi 2+ is quite adequate for compiling and debugging the test programs.

Although RPi Linux already has an ARM compiler installed, the executable programs it creates are heavily dependant on the operating system, so we also need to install a cross-compiler: arm-none-eabi-gcc version 7-2018-q2-update. The easiest way to do this is to click on Add/Remove software in the Preferences menu, then search for arm-none-eabi. The correct version is available on Raspbian ‘Buster’, but probably not on earlier distributions.

The directory structure is the same as for Windows, with the SDK components, external, integration and modules directories copied into the nrf5_sdk subdirectory.

As with Windows, it is worth typing

arm-none-eabi-gcc  -v

..to make sure the GCC executable is installed correctly.

nrf_test1.c

This is in the nrf_test1 directory, and is as simple as you can get; it just flashes the blue LED at 1 Hz.

// Simple LED blink on nRF52832 breakout board, from iosoft.blog

#include "nrf_gpio.h"
#include "nrf_delay.h"

// LED definitions
#define LED_PIN      7
#define LED_BIT      (1 << LED_PIN)

int main(void)
{
    nrf_gpio_cfg_output(LED_PIN);

    while (1)
    {
        nrf_delay_ms(500);
        NRF_GPIO->OUT ^= LED_BIT;
    }
}

// EOF

An unusual feature of this CPU is that the I/O pins aren’t split into individual ports, there is just a single port with a bit number 0 – 31. That number is passed to an SDK function to initialise the LED O/P pin, and I could have used another SDK function to toggle the pin, but instead used an exclusive-or operation on the hardware output register.

The SDK delay function is implemented by performing dummy CPU operations, so isn’t particularly accurate.

Compiling

For both platforms, the method is the same: change directory to nrf_test1, and type ‘make’; the response should be similar to:

Assembling ../nrf5_sdk/modules/nrfx/mdk/gcc_startup_nrf52.S
 Compiling ../nrf5_sdk/modules/nrfx/mdk/system_nrf52.c
 Compiling nrf_test1.c
 Linking build/nrf_test1.elf
    text    data     bss     dec     hex filename
..for Windows..
    1944     108      28    2080     820 build/nrf_test1.elf
..or for Linux..
    2536     112     172    2820     b04 build/nrf_test1.elf

If your compile-time environment differs from mine, it shouldn’t be difficult to change the Makefile definitions to match, but there are some points to note:

  • The main changeable definitions are towards the top of the file. Resist the temptation to rearrange CFLAGS or LNFLAGS, as this can create a binary image that crashes the target system.
  • You can add files to the SRC_FILES definition, they will be compiled and linked in; the order of the files isn’t significant, but I generally put gcc_startup_nrf52.S first, so Reset_Handler is at the start of the executable code. Similarly, INC_FOLDERS can be expanded to include any other folders with your .h files.
  • The task definitions toward the bottom of the file use the tab character for indentation. This is essential: if replaced with spaces, the build process will fail.
  • ELF, HEX and binary files are produced in the ‘build’ subdirectory; ELF is generally used with GDB, while HEX is required by the JLink flash programmer.
  • I’ve defined the jflash and ocdflash tasks, that do flash programming after the ELF target is built; you can add your own custom programming environment, using a similar syntax.
  • The makefile will re-compile any C source files after they are changed, but will not automatically detect changes to the ‘include’ files, or the makefile itself; when these are edited, it will be necessary to force a re-make using ‘make -B’.
  • If a new image won’t run on the target system, the most common reason is an un-handled exception, and it can be quite difficult to find the cause. So I’d recommend that you expand the code in relatively small steps, making it easier to backtrack if there is a problem.

Device programming

Having built the binary image, we need to program it into Flash memory on the target device. This can be done by:

  • JLink adaptor on an evaluation board (Windows PC only)
  • Directly driving OpenOCD (RPi only)
  • Using the GNU debugger GDB to drive OpenOCD (both platforms)

Device programming using JLink

Set up the hardware and install the Nordic nRF Command Line Tools as described above, then the nrfjflash utility can be used to program the target device with a hex file, e.g.

nrfjprog --program build/nrf_test1.hex --sectorerase
nrfjprog --reset

The second line resets the chip after programming, to start the program running. This is done via the SWD lines, a hardware reset line isn’t required; alternatively you can just power-cycle the target board.

The above commands have been included in the makefile, so if you enter ‘make jflash’, the programming commands will be executed after the binary image is built.

An additional usage of the JLink programmer is to restore the original Arduino bootloader, that was pre-installed on the Sparkfun board. To do this, you need to get hold of the softdevice and DFU files from the Sparkfun repository, combine them using the Nordic merge utility, then program the result using a whole-chip erase:

mergehex -m s132_nrf52_2.0.0_softdevice.hex sfe_nrf52832_dfu.hex -o dfu.hex
nrfjprog --program dfu.hex --chiperase
nrfjprog --reset 

Device programming using OpenOCD

OpenOCD can be used to directly program the target device, providing the image has been built on the Raspberry Pi, or the ELF file has been copied from the development system. Install and test OpenOCD as described in the Raspberry Pi Hardware section above (check the DPIDR value is correct), hit ctrl-C to terminate it, then enter the command:

sudo openocd -f ../openocd/rpi2.cfg -f ../openocd/nrf52_swd.cfg -c "program build/nrf_test1.elf verify reset exit"

The response should be similar to:

 ** Programming Started **
 Info : nRF52832-QFAA(build code: E0) 512kB Flash
 Warn : using fast async flash loader. This is currently supported
 Warn : only with ST-Link and CMSIS-DAP. If you have issues, add
 Warn : "set WORKAREASIZE 0" before sourcing nrf51.cfg/nrf52.cfg to disable it
 ** Programming Finished **
 ** Verify Started **
 ** Verified OK **
 ** Resetting Target **
 shutdown command invoked

Note the warnings: by default, OpenOCD uses a ‘fast async flash loader’ that achieves a significant speed improvement by effectively sending a write-only data stream. Unfortunately the Nordic chip occasionally takes exception to this, and returns a ‘wait’ response, which can’t be handled in fast async mode, so the programming fails – in my tests with small binary images, it does fail occasionally. As recommended in the above text, I’ve tried adding ‘set WORKAREASIZE 0’ to nrf52_swd.cfg (before ‘find target’), but this caused problems when using GDB. By the time you read this, the issue may well have been solved; if not, you might have to do some experimentation to get reliable programming.

The makefile includes the OpenOCD direct programming commands, just run ‘make ocdflash’.

Device programming using GDB and OpenOCD

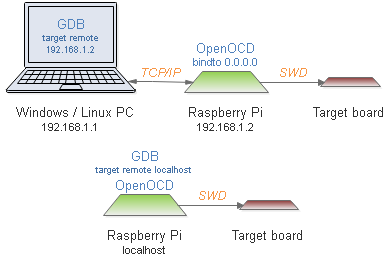
The primary reason for using GDB is to debug the target program, but it can also serve as a programming front-end for OpenOCD. This method works with PC host, or directly on the RPi, as shown in the following diagram.

GDB OpenOCD debugging

In both cases we are using the GB ‘target remote’ command; on the development PC we have to specify the IP address of the RPi: for example, 192.168.1.2 as shown above. If in doubt as to the address, it is displayed if you hover the cursor over the top-right network icon on the RPi screen. By default, OpenOCD only responds to local GDB requests, so the command ‘bindto 0.0.0.0’ must be added to the configuration. This means anyone on the network could gain control of OpenOCD, so use with care: consider the security implications.

Alternatively, the Raspberry Pi can host both GDB and OpenOCD, in which case the ‘localhost’ address is used, and there is no need for the additional ‘bindto’.

The commands for the PC-hosted configuration are:

# On the RPi:
  sudo openocd -f ../openocd/rpi2.cfg -f ../openocd/nrf52_swd.cfg -c "bindto 0.0.0.0"

# On the Windows PC:
arm-none-eabi-gdb -ex="target remote 192.168.1.2:3333" build\nrf_test1.elf -ex "load" -ex "det" -ex "q"

The PC connects to the OpenOCD GDB remote server on port 3333, loads the file into the target flash memory, detaches from the connection, and exits. The response will be something like:

Loading section .text, size 0x790 lma 0x0
 Loading section .ARM.exidx, size 0x8 lma 0x790
 Loading section .data, size 0x6c lma 0x798
 Start address 0x2b4, load size 2052
 Transfer rate: 4 KB/sec, 684 bytes/write.
 Detaching from program: c:\Projects\nrf_test\nrf_test1\build\nrf_test1.elf, Remote target
 Ending remote debugging.

I have experienced occasional failures with the message “Error finishing flash operation”, in which case the command must be repeated; see my comments on the ‘fast async flash loader’ above.

The Rpi-hosted command sequence is similar:

# On the RPi (first terminal):
sudo openocd -f ../openocd/rpi2.cfg -f ../openocd/nrf52_swd.cfg

# On the RPi (second terminal):
gdb -ex="target remote localhost" build\nrf_test1.elf -ex "load" -ex "det" -ex "q" 

Note that the GDB programming cycle does not include a CPU reset, so to run the new program the target reset button must be pressed, or the board power-cycled.

nrf_test2.c

There are many ways the first test program can be extended, I chose to add serial output (including printf), and also a timeout function based on the ARM systick timer, so the delay function doesn’t hog the CPU. The main loop is:

int main(void)
{
    uint32_t tix;

    mstimeout(&tix, 0);
    init_gpio();
    init_serial();
    printf("\nNRF52 test\n");
    while (1)
    {
        if (mstimeout(&tix, 500))
        {
            NRF_GPIO->OUT ^= LED_BIT;
            putch('.');
        }
        poll_serial();
    }
}

I encountered two obstacles; firstly, I ran out of time trying to understand how to create a non-blocking serial transmit routine using the SDK buffering scheme, so implemented a simple circular buffer that is polled for transmit characters in the main program loop.

The second obstacle was that the CPU systick is a 24-bit down-counter clocked at 64 MHz, which means that it wraps around every 262 milliseconds. So we can’t just use the counter value to check when 500 milliseconds has elapsed, it needs some creative coding to measure that length of time; with hindsight, it might have been better to use a conventional hardware timer.

To build the project just change directory to nrf_test2, and use ‘make’ as before. The source code is fairly self explanatory, but the following features are a bit unusual:

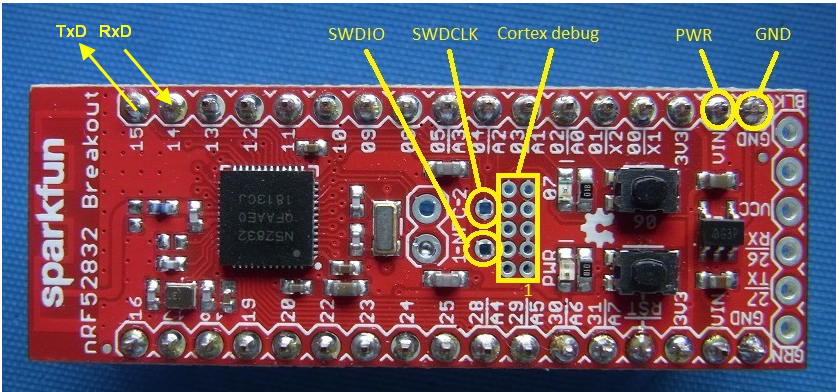
  • For printf serial output, the Arduino programming link on the 6-way connector can’t be used, so we have to select an alternative.
  • A remarkable feature of the UART is that we can choose any unused pin for I/O; the serial signals aren’t tied to specific pins. I’ve arbitrarily chosen I/O pin 15 for output, 14 for input.
  • The method of initialising the UART and the printf output is also somewhat unusual, in that it involves a ‘context’ structure with the overall settings, in addition to the configuration structure.

Viewing serial comms

Serial I/O pins used by nrf_test2
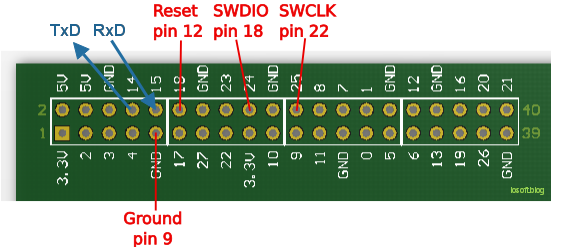
Raspberry Pi SWD and serial connections

The serial output from the target system I/O pin 15 is a 3.3V signal, that is compatible with the serial input pin 10 (BCM 15) on the RPi (TxD -> RxD). To enable this input, launch the Raspberry Pi Configuration utility, select ‘interfaces’, enable the serial port, disable the serial console, and reboot.

To view the serial data, you could install a comms program such as ‘cutecom’, or just enter the following command line in a terminal window (ctrl-C to exit):

stty -F /dev/ttyS0 115200 raw; cat /dev/ttyS0

Debugging

We have already used GDB to program the target system, a similar setup can be used for debugging. Some important points:

  • You’ll be working with 2 binary images; one that is loaded into GDB, and another that has been programmed into the target, and these two images must be identical. If in doubt, you need to reprogram the target.
  • The .elf file that is loaded into GDB contains the binary image and debug symbols, i.e.the names and addresses of your functions & variables. You can load in a .hex file instead, but that has no symbolic information, so debugging will be very difficult.
  • Compiler optimisation is normally enabled (using the -O3 option) as it generates efficient code, but this code is harder to debug, since there isn’t a one-to-one correspondence between a line of source and a block of instructions. Disabling optimisation will make the code larger and slower, but easier to debug; to do this, comment out the OPTIMISE line in the makefile (by placing ‘#’ at the start) and rebuild using ‘make -B’
  • OpenOCD must be running on the Raspberry Pi, configured for SWD mode and the NRF52 processor (files rpi2.cfg and nrf52_swd.cfg). It will be fully remote-controlled from GDB, so won’t require any other files on the RPi.
  • GDB must be invoked in remote mode, with “target remote ADDR:3333” where ADDR is the IP address of the Raspberry Pi, or localhost if GDB and OpenOCD are running on the same machine.
  • GDB commands can be abbreviated providing there is no ambiguity, so ‘print’ can be shortened to ‘p’. Some commands can be repeated by hitting the Enter key, so if the last command was ‘step’, just hit Enter to do another step.
  • When stepping through code, the main command letters you need to remember are ‘s’ for a single source-line step, ‘n’ for the next source line (executing any intervening function calls, but not stopping in them) and ‘f’ to execute the current function to its finish, and halt on return to the caller.

Here is a sample debugging session (user commands in bold):

# On the RPi:
sudo openocd -f ../openocd/rpi2.cfg -f ../openocd/nrf52_swd.cfg -c "bindto 0.0.0.0"

# On the PC, if RPi is at 192.168.1.2:
arm-none-eabi-gdb -ex="target remote 192.168.1.2:3333" build/nrf_test2.elf
Target system halts, current source line is shown

# Program binary image into target system
load
Loading section .text, size 0x215c lma 0x0
Loading section .log_const_data, size 0x10 lma 0x215c
..and so on..

# Print Program Counter (should be at reset handler)
p $pc
$1 = (void (*)()) 0x2b4 <Reset_Handler>

# Execute program (continue)
c

# Halt program: hit ctrl-C, target reports current location
ctrl-C
Program received signal SIGINT, Interrupt.
 main () at nrf_test2.c:72
 72              poll_serial();

# Print millisecond tick count
p msticks
$3 = 78504

# Print O/P port value in hex
p/x NRF_GPIO->OUT
$4 = 0x8080

# Toggle LED pin on O/P port
set NRF_GPIO->OUT ^= 1<<7

# Restart the program from scratch, with breakpoint
set $pc=Reset_Handler
b putch
c
Breakpoint 1, putch (c=13) at nrf_test2.c:149
 149         int in=ser_txin+1;

# Single-step, and print a local variable
s
151         if (in >= SER_TX_BUFFLEN)
p in
$5 = 46

# Detach from remote, and exit
det
quit

Next step

I guess the next step is to get wireless communications working, watch this space…

Copyright (c) Jeremy P Bentham 2019. Please credit iosoft.blog if you use the information or software in here.