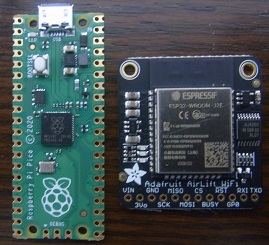

There are various ways that the Pi Pico (RP2040) can be given a wireless interface; in a previous post I used a Microchip ATWINC1500, now I’m using the Espressif ESP32 WROOM-32. The left-hand photo above shows an Adafruit Airlift ESP32 co-processor board which must be hand-wired to the Pico, whilst the right-hand is a Pimorini Wireless Pack that plugs directly into the Pico, either back-to-back, or (as in the photo) on an Omnibus baseboard that allows multiple I/O boards to be attached to a single Pico.
So you can add WiFi connectivity to your Pico without any additional wiring.
The resulting hardware would normally be programmed in C, but I really like the simplicity of MicroPython, so have chosen that language, but this raises an additional question; do I use the Pimorini MicroPython that is derived from the Pi Foundation version, or CircuitPython, which is a derivative created by Adafruit, with various changes?
CircuitPython includes a lot of I/O libraries as standard, but does lack some important features (such as direct access to memory) that are useful to the more advanced developer. So I’ll try to support both, but I do prefer the working with MicroPython.
SPI interface
The ESP32 does all the hard work of connection to the WiFi network and handling TCP/IP sockets, it is just necessary to send the appropriate commands over the SPI link. In addition to the usual clock, data and chip-select lines, there is a ‘reset’ signal from the Pico to the ESP, and a ‘ready’ signal back from the ESP to the Pico. This is necessary because the Pico spends much of its time waiting for the ESP to complete a command; instead of continually polling for a result, the Pico can wait until ‘ready’ is signalled then fetch the data.
My server code uses the I/O pins defined by the Adafruit Pico Wireless Pack:
Function            GPIO  Pin num
Clock               18    24
Pico Tx data (MOSI) 19    25
Pico Rx data (MISO) 16    21
Chip select (CS)     7    10
ESP32 ready         10    14
ESP32 reset         11    15
Software components

ESP32 code
The ESP32 code takes low-level commands over the SPI interface, such as connecting and disconnecting from the wireless network, opening TCP sockets, sending and receiving data. The same ESP32 firmware works with both the MicroPython and CircuitPython code and I suggest you buy an ESP32 module with the firmware pre-loaded, as the re-building & re-flashing process is a bit complicated, see here for the code, and here for a guide to the upgrade process. I’m using 1.7.3, you can check the version in CircuitPython using:
import board
from digitalio import DigitalInOut
esp32_cs = DigitalInOut(board.GP7)
esp32_ready = DigitalInOut(board.GP10)
esp32_reset = DigitalInOut(board.GP11)
spi = busio.SPI(board.GP18, board.GP19, board.GP16)
esp = adafruit_esp32spi.ESP_SPIcontrol(spi, esp32_cs, esp32_ready, esp32_reset)
print("Firmware version", esp.firmware_version.decode('ascii'))
Note that some ESP32 modules are preloaded with firmware that provides a serial interface instead of SPI, using modem-style ‘AT’ commands; this is incompatible with my code, so the firmware will need to be re-flashed.
MicroPython or CircuitPython
This has to be loaded onto the Pico before anything else. There are detailed descriptions of the loading process on the Web, but basically you hold down the Pico pushbutton while making the USB connection. The Pico will then appear as a disk drive in your filesystem, and you just copy (drag-and-drop) the appropriate UF2 file onto that drive. The Pico will then automatically reboot, and run the file you have loaded.
The standard Pi Foundation MicroPython lacks the necessary libraries to interface with the ESP32, so we have to use the Pimorini version. At the time of writing, the latest ‘MicroPython with Pimoroni Libs’ version is 0.26, available on Github here. This includes all the necessary driver code for the ESP32.
If you are using CircuitPython, the installation is a bit more complicated; the base UF2 file (currently 7.0.0) is available here, but you will also need to create a directory in the MicroPython filesystem called adafruit_esp32spi, and load adafruit_esp32spi.py and adafruit_esp32spi_socket.py into it. The files are obtained from here, and the loading process is as described below.
Loading files through REPL
A common source of confusion is the way that files are loaded onto the Pico. I have already described the loading of MicroPython or CircuitPython UF2 images, but it is important to note that this method only applies to the base Python code; if you want to add files that are accessible to your software (e.g. CircuitPython add-on modules, or Web pages for the server) they must be loaded by a completely different method.
When Python runs, it gives you an interactive console, known as REPL (Read Evaluate Print Loop). This is normally available as a serial interface over USB, but can also be configured to use a hardware serial port. You can directly execute commands using this interface, but more usefully you can use a REPL-aware editor to prepare your files and upload them to the Pico. I use Thonny; Click Run and Select Interpreter, and choose either MicroPython (Raspberry Pi Pico) or CircuitPython (Generic) and Thonny will search your serial port to try and connect to Python running on the Pico. You can then select View | Files, and you get a window that shows your local (PC) filesystem, and also the remote Python files. You can then transfer files to & from the PC, and create subdirectories.
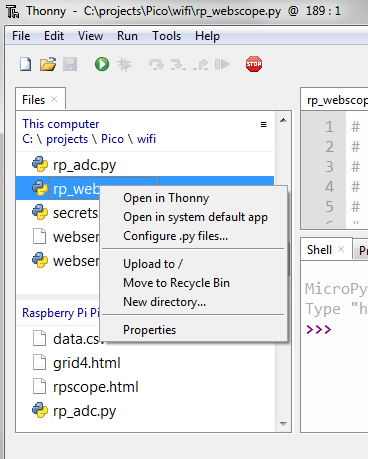
At the time of writing, Thonny can’t handle drag-and-drop between the local & remote directories; you have to right-click on a file, then select ‘upload’ to copy it to the currently-displayed remote directory. Do not attempt a transfer while the remote MicroPython program is running; hit the ‘stop’ button first.
In the case of CircuitPython, you need to create a subdirectory called adafruit_esp32spi, containing adafruit_esp32spi.py and adafruit_esp32socket.py.
Server code
To accommodate the differences between the two MicroPython versions, I have created an ESP32 class, with functions for connecting to the wireless network, and handling TCP sockets; it is just a thin wrapper around the MicroPython functions which send SPI commands to the ESP32, and read the responses.
Connecting to the WiFi network just requires a network name (SSID) and password; all the complication is handled by the ESP32. Then a socket is opened to receive the HTTP requests; this is normally on port 80.
def start_server(self, port):
    self.server_sock = picowireless.get_socket()
    picowireless.server_start(port, self.server_sock, 0)
There are significant differences between conventional TCP sockets, and those provided by the ESP32; there is no ‘bind’ command, and the client socket is obtained by a strangely-named ‘avail_server’ call, which also returns the data length for a client socket – a bit confusing. This is a simplified version of the code:
def get_client_sock(self, server_sock):
    return picowireless.avail_server(server_sock)

def recv_length(self, sock):
    return picowireless.avail_server(sock)

def recv_data(self, sock):
    return picowireless.get_data_buf(sock)

def get_http_request(self):
    self.client_sock = self.get_client_sock(self.server_sock)
    client_dlen = self.recv_length(self.client_sock)
    if self.client_sock != 255 and client_dlen > 0:
        req = b""
        while len(req) < client_dlen:
            req += self.recv_data(self.client_sock)
        request = req.decode("utf-8")
        return request
    return None
When the code runs, the IP address is printed on the console
Connecting to testnet...
WiFi status: connecting
WiFi status: connected
Server socket 0, 10.1.1.11:80
Entering the IP address (10.1.1.11 in the above example) into a Web browser means that the server receives something like the following request:
GET / HTTP/1.1
Host: 10.1.1.11
Connection: keep-alive
Cache-Control: max-age=0
Upgrade-Insecure-Requests: 1
User-Agent: Mozilla/5.0 (Windows NT 6.1; Win64; x64) AppleWebKit/537.36 (KHTML, like Gecko) Chrome/93.0.4577.82 Safari/537.36
Accept: text/html,application/xhtml+xml,application/xml;q=0.9,image/avif,image/webp,image/apng,*/*;q=0.8,application/signed-exchange;v=b3;q=0.9
Accept-Encoding: gzip, deflate
Accept-Language: en-GB,en-US;q=0.9,en;q=0.8
Most of this information is irrelevant to a tiny Web server, since there is little choice over the information it returns. The first line has the important information, namely the resource that is being requested, so instead of decoding the whole message, we can do simple tests to match the line to known resources:
DIRECTORY = "/"
INDEX_FNAME   = "rpscope.html"
DATA_FNAME    = "data.csv"
ICON_FNAME    = "favicon.ico"

DISABLE_CACHE = "Cache-Control: no-cache, no-store, must-revalidate\r\n"
DISABLE_CACHE += "Pragma: no-cache\r\nExpires: 0\r\n"

req = esp.get_http_request()
if req:
    r = req.split("\r")[0]
    if ICON_FNAME in r:
        esp.put_http_404()
    elif DATA_FNAME in r:
        esp.put_http_file(DIRECTORY+DATA_FNAME, "text/csv", DISABLE_CACHE)
    else:
        esp.put_http_file(DIRECTORY+INDEX_FNAME)
Since we are dealing with live data, that may change every time it is fetched, the browser’s caching mechanism must be disabled, hence the DISABLE_CACHE response, which aims to do so regardless of which browser version is in use.
Sending the response back to the browser should be easy, it just needs to be split into chunks of maximum 4095 bytes so as to not overflow the SPI buffers. However I had problems with unreliability of both the MicroPython and CircuitPython implementations; sometimes the network transfers would just stall. The solution seems to be to drastically reduce the SPI block size; some CircuitPython code uses 64-byte blocks, but I’ve found 128 bytes works OK. Further work is needed to establish the source of the problem, but this workaround is sufficient for now.
MAX_SPI_DLEN = const(128)
HTTP_OK = "HTTP/1.1 200 OK\r\n"
CONTENT_LEN = "Content-Length: %u\r\n"
CONTENT_TYPE = "Content-type %s\r\n"
HEAD_END = "\r\n"

def put_http_file(self, fname, content="text/html; charset=utf-8", hdr=""):
    try:
        f = open(fname)
    except:
        f = None
    if not f:
        esp.put_http_404()
    else:
        flen = os.stat(fname)[6]
        resp = HTTP_OK + CONTENT_LEN%flen + CONTENT_TYPE%content + hdr + HEAD_END
        self.send_data(self.client_sock, resp)
        n = 0
        while n < flen:
            data = f.read(MAX_SPI_DLEN)
            self.send_data(self.client_sock, data)
            n += len(data)
        self.send_end(self.client_sock)
Dynamic web server
A simple Web server could just receive a page request from a browser, match it with a file in the Pico filesystem, and return the page text to the browser. However, I’d like to report back some live data that has been captured by the Pico, so we need a method to return dynamically-changing values.
There are three main ways of doing this; server-side includes (SSI), AJAX, and on-demand page creation.
Server-side includes
A Web page that is stored in the server filesystem may include tags that trigger the server to perform specific actions, for example when the tag ‘$time’ is reached, the server replaces that text with the current time value. A slightly more sophisticated version embeds the tag in an HTML comment, so the page can be displayed without a Pico server, albeit with no dynamic data.
The great merit of this approach is its simplicity, and I used it extensively in my early projects. However, there is one major snag; the data is embedded in an HTML page, so is difficult to extract. For example, you may have a Web page that contains the temperature data for a 24-hour period, and you want to aggregate that into weekly and monthly reports; you could write a script that strips out the HTML and returns pure data, but it’d be easier if the Web server could just provide a data file for each day.
AJAX
Web pages routinely include Javascript code to perform various display functions, and one of these functions can fetch a data file from the server, and display its contents. This is commonly known as AJAX (Asynchronous Javascript and XML) though in reality there is no necessity for the data to be in XML format; any format will do.
For example, to display a graph of daily temperatures, the Browser loads a Web page with the main formatting, and Javascript code that requests a comma-delimited (CSV) data file. The server prepares that file dynamically using the current data, and returns it to the browser. The Javascript on the browser decodes the data, and displays it as a graph; it can also perform calculations on the data, such as reporting minimum and maximum values.
The key advantage is that the data file can be made available to any other applications, so a logging application can ignore all the Javascript processing, and just fetch the data file directly from the server.
With regard to the data file format, I prefer not to use XML if I can possibly avoid it, so use Javascript Object Notation (JSON) for structured data, and comma-delimited (CSV) for unstructured values, such as data tables.
The first ‘A’ in AJAX stands for Asynchronous, and this deserves some explanation. When the Javascript fetches the data file from the server, there will be a delay, and if the server is heavily loaded, this might be a substantial delay. This could result in the code becoming completely unresponsive, as it waits for data that may never arrive. To avoid this, the data fetching function XMLHttpRequest() returns immediately, but with a callback function that is triggered when the data actually arrives from the server – this is the asynchronous behaviour.
There is now a more modern approach using a ‘fetch’ function that substitutes a ‘promise’ for the callback, but the net effect is the same; keeping the Javascript code running while waiting for data to arrive from the server.
On-demand page creation
The above two techniques rely on the Web page being stored in a filesystem on the server, but it is possible for the server code to create a page from scratch every time it is requested.
Due to the complexity of hand-coding HTML, this approach is normally used with page templates, that are converted on-the-fly into HTML for the browser. However, a template system would add significant complexity to this simple demonstration, so I have used the hand-coding approach to create a basic display of analog input voltages, as shown below.
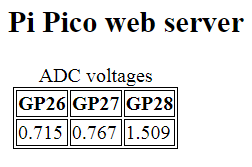
This data table is created from scratch by the server code, every time the page is loaded:
ADC_PINS = 26, 27, 28
ADC_SCALE = 3.3 / 65536
TEST_PAGE = '''<!DOCTYPE html><html>
    <head><style>table, th, td {border: 1px solid black; margin: 5px;}</style></head>
    <body><h2>Pi Pico web server</h2>%s</body></html>'''

adcs = [machine.ADC(pin) for pin in ADC_PINS]

heads = ["GP%u" % pin for pin in ADC_PINS]
vals = [("%1.3f" % (adc.read_u16() * ADC_SCALE)) for adc in adcs]
th = "<tr><th>" + "</th><th>".join(heads) + "</th></tr>"
tr = "<tr><td>" + "</td><td>".join(vals) + "</td></tr>"
table = "<table><caption>ADC voltages</caption>%s</table>" % (th+tr)
esp.put_http_text(TEST_PAGE % table)
Even in this trivial example, there is significant work in ensuring that the HTML tags are nested correctly, so for pages with any degree of complexity, I’d normally use the AJAX approach as described earlier.
Running the code
The steps are:
- Connect the wireless module
- Load the appropriate UF2 file
- In the case of CircuitPython, load the add-on libraries
- Get the Web server Python code from Github here. The file rp_esp32.py is for MicroPython with Pimoroni Libraries, and rp_esp32_cp.py is for CircuitPython.
- Edit the top of the server code to set the network name (SSID) and password for your WiFi network.
- Run the code using Thonny or any other MicroPython REPL interface; the console should show something like:
Connecting to testnet...
WiFi status: connecting
WiFi status: connected
Server socket 0, 10.1.1.11:80
- Run a Web browser, and access test.html at the given IP address, e.g. 10.1.1.11/test.html. The console should indicate the socket number, data length, the first line of the HTTP request, and the type of request, e.g.
Client socket 1 len 466: GET /test.html HTTP/1.1 [test page]
The browser should show the voltages of the first 3 ADC channels, e.g.

The Web pages produced by the MicroPython and CircuitPython versions are very similar; the only difference is in the table headers, which either reflect the I/O pin numbers, or the analog channel numbers.
If a file called ‘index.html’ is loaded into the root directory of the MicroPython filesystem, it will be displayed in the browser by default, when no filename is entered in the browser address bar. A minimal index page might look like:
<!doctype html><html><head></head>
  <body>
    <h2>Pi Pico web server</h2>
    <a href="test.html">ADC test</a>
  </body>
</html>
So far, I have only presented very simple Web pages; in the next post I’ll show how to fetch high-speed analog samples using DMA, then combine these with a more sophisticated AJAX functionality to create a Web-based oscilloscope.
Copyright (c) Jeremy P Bentham 2021. Please credit this blog if you use the information or software in it.

“My server code uses the I/O pins defined by the Adafruit Pico Wireless Pack, but these can easily be changed.”
Sorry but I didn’t find a method to change the I/O pins. Please give an example .
LikeLike
You are quite right, it is possible to change the pins in the CircuitPython version (ESP32 class init in rp_esp32_cp.py), but the Pimorini MicroPython version doesn’t allow this. I have changed the text.
LikeLike
Thanks for the great tutorial.
We have a situation where obtaining the IP address is not possible.
The dhcp_host_name feature would seem to be helpful here, but we cannot get it to work.
Have you ever gotten the dhcp_host_name feature to work? How?
How would you troubleshoot this on a Windows PC?
Thanks!
LikeLike
No I haven’t used that function; I have used MDNS,begin and MDNS.addService to get similar functionality, but have found their operation to be strangely unreliable, sometimes working fine, sometime not; I haven’t yet worked out what is going on.
LikeLike